The iPhone camera will now default to taking pictures in a new HEIF format, rather then JPEG. This camera formatting change to HEIF came in iOS 11, but some iPhone users may prefer to have the camera continue to snap photos in JPEG format for broader compatibility with sharing, copying to a computer, and more.
We'll show you how you can change the iPhone camera default image file type so that the iPhone will shoot pictures in JPEG format again. We'll also cover a trick for leaving HEIF image format enabled but have those HEIF images automatically convert to JPEG files upon transfer to a computer.
The iPhone camera image format setting is new to iOS 11 or later. Keep in mind that HEIF (High Efficiency Image Format, HEIF images have a .heic file extension) allows for greater file compression, meaning each HEIF picture file takes up less storage space than a standard JPEG image, sometimes up to half the size per image. While JPEG images are larger, they're also broadly compatible without any conversion, and they might be easier to share for some users. Whether you want to use HEIF or JPEG for shooting iPhone pictures is up to you.
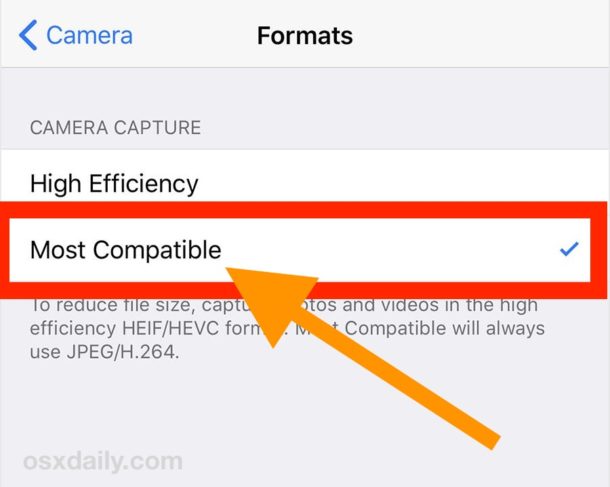
Want your iPhone pictures to be captured and stored as JPEG, as it was before the latest iOS update? Here's how to make the setting change in iOS:
With the "Most Compatible" setting enabled, all iPhone images will be captured as JPEG files, stored as JPEG files, and copied as JPEG image files too. This can help for sending and sharing pictures, and using JPEG as the image format for iPhone camera was the default since the first iPhone anyway.
Existing .heic files can be converted manually to JPEG or another file format if need be.
How to Enable HEIF Image Format on iPhone Camera with Image Transfer Compatibilitylf you'd like to shoot and store HEIF images with iPhone camera and have them automatically convert to JPEG only upon copying to a computer, here's the settings to enable:
If you're going to leave HEIF format enabled on iPhone camera, then being sure the automatic image conversion setting is enabled is a good idea, because it will automatically convert the HEIF format images into JPEG format if the pictures are being copied from the iPhone to a Mac or transferred from an iPhone to a Windows PC.
Future iPhone models will likely continue to use the HEIF format, but whether you want to use the new HEIF image format or the old traditional JPEG image format for your iPhone camera shots is entirely up to you. Just remember that while HEIF may save storage space on an iOS device, you may experience less image compatibility (before the pictures are converted anyway), whereas JPEG images will take up more storage but be universally compatible with basically any device, computer, operating system, or image reader.
Source: How to Make iPhone Camera Shoot JPEG Pictures in iOS 11


No comments:
Post a Comment